The Cedar Strips
Lots of Cedar Strips
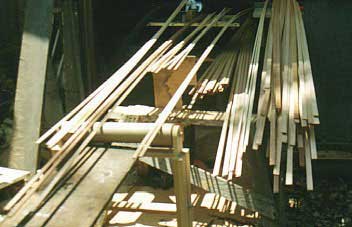
For the lumber to cut the Cedar Strips we will purchase four clear, straight grain, cedar boards 1"X6" by 16' long. On a table saw with a thin kerf ripping blade we'll rip the boards down to 7/8" pieces. We now have about 20 sixteen foot strips 3/4"X7/8". We'll take each of these strips, lay them with the 7/8" side down on the table saw and rip them to 1/4', making about 80, 3/4" by 1/4", strips. Rather than have an all cedar look to our canoe we'll add a little color with a few accent strips. I found a piece of pine molding material that was 2"X1/4"X16' and very clean. From this I ripped four 1/4" by 3/8" accent strips. Also, from a piece of redwood bender board I was able to get 1/4" by 1/2" accent strips. These can be seen in the next picture. Also, note the masking tape on the stem mold.
All these strips will fit together much more nicely if we route a bead and cove on the edges of each strip. This can be done with special router bits set up with the router and router table. We will route the bead on each strip first, then the cove. We'll cover the edges of the station molds on the strongback with masking tape to prevent the glue from sticking and we are ready to begin stripping our canoe.
First few Cedar Strips
Our first strip will be stapled at its center to the center mold #0 with its cove side up. Keeping it level, staple it at each mold out toward the ends and onto the stem mold. The second strip is then stapled similarly to the other side. Be careful not to staple through the cove or bead of the strips. When we reach the stem mold, the end of the first strip will be cut at an angle that is in line with the lay of the second strip. Glue the ends of the two strips together and hold them with a spring clamp. Carpenter's white glue is used to glue all the strips together. The third strip in stapled into the cove of the first strip. Run a bead of glue the whole length of the first strip and staple it to the molds as before. This alternating sequence is followed for all the stripping.
After each alternating strip in attached we will cut the ends off so they conform to the curve of the stem mold. Be sure each strip is pushed firmly down into the cove of the preceeding strip before stapling. Wipe the glue off inside and out with a damp cloth after attaching each strip. This will save us a lot of sanding work later.
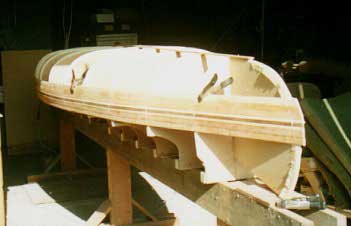
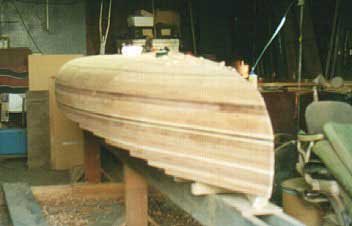
All strips in place
We will attach the accent strips after about three or four strips have been laid down. After the accent strips I added eight more cedar strips then laid another redwood accent strip. I used this pattern until I reached the bottom of the canoe. As we move from the side of the canoe toward the bottom the curve becomes a little more accute so the strips need a little more persuasion to make them fit properly in place. There is a transition point where the strip sides no longer fit together as flat sides. This is where the stem curve comes toward the bottom. Now we have to start cutting the strips on an angle across the flat and fit them into the cove of the preceeding strip. This continues as we move to the bottom center of the canoe using progressively shorter strips. Finally, when there is only a sliver of a hole left, we will have to carve a special strip to finish the bottom. By now we have used about 500 staples and a quart of glue.
The only strips to attach now are those that will build up the ends so the canoe will curve up at the bow and stern. About six additional strips are added to each corner, 24 more in all. See picture. Each strip is a little shorter than the one before, the first one starting at mold #1 and the last starting near mold #6. This work is a little more tricky as we are gluing the strips on up-side-down, so to speak.
The next step will be to pull out all the staples and sand the entire surface so it is smooth with no bumps ot holes. If a hole is found or a crack between two strips we will need to fill it. One way to fill small holes and cracks is to mix some cedar sawdust with glue, making a soft putty. Fill the cracks and when the glue is dry, sand them down smooth.
Next Page - Fiberglass & Epoxy
Home page || Plan || Strips || Fiberglass || Gunwales || Decks || Paddles || Hume Lake || More Paddling || Materials
For the web pages of 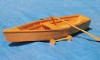 Boats 'n Things - Skiffs Models
Comments or Questions?
Email wolfden@terragon.com