Fiberglass & Epoxy
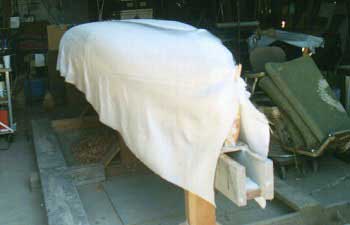
Fiberglass cloth over our Canoe Strips
Now that we have sanded our canoe to a smooth, fair surface we are ready for the next phase, fiberglassing. Before laying the fiberglass on the canoe we will give it a primer coating of Clear Coat Epoxy. In my construction project, I used "System Three" products. Other makes of epoxy will work just as well, such as "West", "Mas", etc. System Three epoxy is mixed 2 to 1. The ratio of other epoxies may be different. The Clear Coat is thinner than the laminating epoxy and will be absorbed by the wood, making an excellent primer base. Mix according to the manufacturer's directions and brush on using a foam brush. When the Clear Coat has cured (the next day) we'll sand again. This time using about 150 grade paper and making sure we don't sand through the primer coat.
The fiberglass cloth will be in a roll, probably folded once lengthwise. On a large flat surface (a sheet of plywood on two sawhorses works well), we'll roll out the cloth and cut off 5-1/2 yards or 16-1/2 feet. Leave it folded and place it with the center fold down the center of the canoe. Unroll the cloth on the canoe and gently smooth it over the surface. Now we are ready for epoxy.
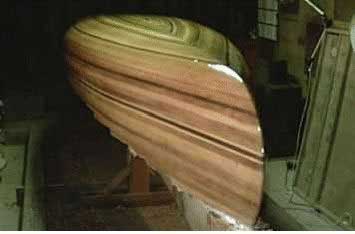
Three coats of Epoxy makes her shine
We'll pull on a pair of latex gloves and mix our epoxy resin and hardener in a clean 32 oz. cardboard or plastic tub. I like to mix about 12 to 16 ounces at a time as I can spread and work this amount into the fiberglass before it begins to turn from liquid to gel. This time period is called the pot life (or the time it takes to go off). Once the epoxy is spread out on the canoe surface it will take a little longer to "go off" as there is less heat generated by the chemical reaction. We'll pour the mixed epoxy on the center of the canoe and work it toward the ends and down the sides. With a plastic squeege and foam brush, spread it over as much area as it will be absorbed into the fiberglass cloth. This step is called "wetting out" the fiberglass. With our next batch of epoxy, we'll go to the other side of the canoe and work the center section and out toward the ends. Keep the fiberglass smooth and laying flat on the wood surface.
When we near one end of our canoe we'll gently pull the cloth around the stem and cut it off allowing about 2" to fold around to the other side. Small pieces of cloth may have to be cut away so it will fold around smoothly. Apply more epoxy resin to complete the end, then repeat this procedure at the other end. When this epoxy has cured (about 20 hours) it's time to do some more sanding. Sand out any rough spots with coarse paper then sand the entire surface with a fine grade paper. Now that we have applied the first coat of epoxy to our canoe, for the first time, we can see the real beauty of the cedar. After sanding, the second coat is applied. This coat will go on easier and we will not have to mix up as much as for the first coat. Sand again and apply the third coat of epoxy. By now we have filled the fiberglass and have a smooth shiny surface. Stand back and have a look. From here things only get better.
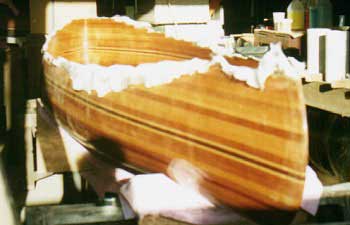
Fiberglass and two coats of Epoxy inside
After the epoxy on the outside has fully cured we will remove our canoe from the molds and the strongback. To prepare for this I made two frames from the particle board material left after cutting the molds for #4 stations - the reverse shape of the molds. I screwed these to two sawhorses and lined the reverse molds with strips of towel. Now I had two cradles in which to rest our canoe when it is turned right-side-up. Remove any screws holding the stems and #6 molds to the strongback. From the inside, gently tap the strips away from the molds, just enough to break them loose from the masking tape. Lift the canoe off the molds, turn it over and place it in the two cradles. Now we are ready to tackle the inside.
We'll scrape and sand the inside until it is smooth as we did the outside. Fill any cracks with sawdust putty and sand smooth. Brush in a coat of epoxy primer and let it cure overnight. Lightly sand the inside, then lay in the fiberglass cloth smoothing it from the center up the sides and out toward the stems. Clothes pins will help hold the cloth in place along the upper edges. Mix up a batch of epoxy resin and pour it into the center of the canoe. Now, using squeeges, spread the epoxy over the inside surface, working first up the sides and out toward the ends. When we come to the inside crevace of the stems we will have to cut the cloth so it will fold over on itself. Use a foam brush wetted with resin to gently push the cloth into the ends. Keep the cloth smooth during this procedure and squeege out any excess resin and disgard it. When this coat has cured we will apply a second coat of epoxy. The surface of the inside wil be almost as smooth as the outside but not quite. There is an advantage to this - it will not be as slippery when it becomes wet during use. Now we'll go on to cutting the sheer line and doing some fine woodwork.
 Cedar Canoe Home Page
Plan || Strips || Fiberglass || Gunwales || Decks || Paddles || Hume Lake || More Paddling || Materials
For the web pages of  Boats 'n Things - Clock Boats,
click here.
Boats 'n Things - Clock Boats,
click here.