Decks, Yoke and Seats
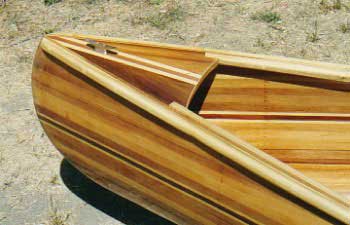
The Bow Deck Installed
The decks can be built in several different ways - cut from a single piece of wood, glue many strips of wood together and cut the triangular shape or, in our case, by gluing a few pieces of wood. We'll take the 6"X24" piece of cedar and crosscut it in half (this piece should be 12" wide if a single-piece deck is to be made). With each half we'll make one deck. Now we'll rip each piece diagonally from one corner to the other. Make a jig for the table saw to cut this low angle. Flip one piece end for end and place together at the sawcut so the grains are running away from each other. The grain will run in line with the sides of the canoe. Between these two triangles we will place two 3/4" pieces of redwood and one 1" piece of pine. See picture. Glue and clamp all five pieces together. Be sure they lay flat on the work surface - use additional clamps where necessary. Let the glue dry for a day, then sand both sides smooth.
Going back to the canoe, we'll cut the finish length of the inwales. Place a thin flat piece of wood between the inwale and the canoe side to protect it from an accidental saw cut. The length we cut the inwales will be determined by the length of the deck. In our case we will have a 12" long deck so we'll cut the inwales at 10 inches from the inside point at the stem. This will allow for a 2" inset of the inwale into the deck. See picture. Now we can install the last few screws at the ends of the inwales.
We'll place the (uncut) deck over the bow with the center accent strips lined up with center longitudinal line of the canoe. Carefully draw the shape of the deck from the underside. Fit the deck into the bow - we may have to make some minor adjustments with sanding block and plane. I epoxied a piece of 1/2" plywood to the underside of each deck. To this I screwed a tiedown bracket for securing the canoe to the car roofrack. Once we have a perfect fit we'll glue and screw the deck in place. The ends of the outwales are still hanging free as we did not screw them at the ends. Now we'll mark the position for these screws, countersink and drill pilot holes and drive the screws through the outwale and the hull and into the deck. The screws here should be a little longer than those used for the gunwales. About 2-1/2" or 3" should bite well into the deck. Three screws each should finish off the outwale ends. Follow this procedure at the stern and we have decks installed.
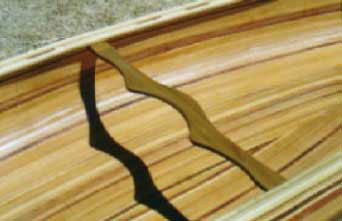
The Carrying Yoke
The yoke serves two purposes. One, to maintain the width at the center giving stiffness to our canoe and two, it provides a point at which the canoe can be carried on the shoulders. The yoke is made from the poplar material left from making the seats. We'll cut a piece 3"X36", draw the yoke shape on it and cut it out with a bandsaw or the jig saw. The exact curve of the yoke can be determined by cutting a pattern from cardboard and fitting it around your shoulders. Round the edges and carve down the shoulder curve. Sand smooth and give it three coats of marine varnish. When the varnish is dry we'll install the yoke. Place the yoke under the inwales at the center of the canoe with the shoulder curve toward the bow. Clamp it in place or have a helper hold it. Drill and countersink two 3/16" holes, about 1-3/4" apart (7/8" on either side of the center mark) through the inwale and through the end of the yoke. Bolt the yoke in place using #10X2" flat head machine screws or carridge bolts with washers and nyloc nuts. If the countersink holes are set about 1/4" deep they can be filled with wood filler to hide the screw heads. This can be done in the finishing step.
Did you place your new cane seats across two chairs and sit on them to see how they feel? I did. We're ready now to install those seats in our canoe.
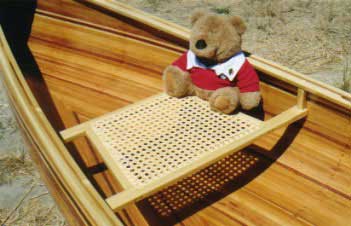
Brownie Muldoon - Testing the Seat
We marked the position for the seats while fitting the inwales. Lets start with the bow seat. Measure the width of the canoe, under the inwale, at the forward seat rail marks. This is the width we'll cut the forward rail (the narrow side of the seat). Measure the canoe width at the aft rail marks. This is the width we'll cut the aft rail (the wide side of the seat). After cutting the width of the rails, dab some varnish on the ends to seal them. Cut four pieces of poplar at 3/4"X1"X2" for the seat hangers (near Brownie's left bearclaw). Drill a 1/4" hole through the center of each hanger from one end to the other - sand and varnish. Fit the seat up under the inwales and mark the position for the 1/4" carridge bolts. Drill the holes for the seat bolts, through the inwale and the seat rail end. Be careful not to drill into the cedar strips. Position the 2" wood hangers between the inwale and the seat frame and insert the carridge bolts. Install a flat washer and a nyloc nut on each bolt.
Installing the stern seat is almost the same except that it fits into a smaller space so the seat rails will be shorter. The wide side of the seat goes forward. Measure between the marks as we did with the bow seat and follow the same procedure. The wood hangers will be 2" for the forward rail and 4" for the aft rail. Here the rise to the stem is more abrupt. (In all we are making six 2" and two 4" hangers.) Climb in and have a seat. "Feels good, eh?" said Brownie Muldoon. The only thing missing is paddles. We'll build those next and while we're waiting for glue to dry and such, we'll do the varnish work on our canoe.

 Cedar Canoe Page
Plan || Strips || Fiberglass || Gunwales || Decks || Paddles || Hume Lake || More Paddling || Materials
Comments or Questions?
Email wolfden@terragon.com